The Fine Art of Metal Shaping Continued - Part 3
|
|
|
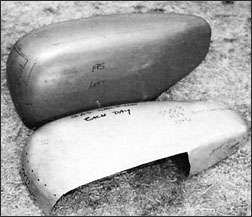
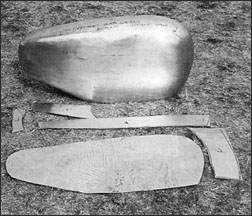
Experience with sheet aluminum tells one the size, shape and number of pieces that can most readily be hand-hammered and English-wheeled to shape and then welded together. When each piece is being shaped, it is frequently held against the pattern object to see where and how much it needs further shaping. |
When heated, the flux used for welding aluminum develops spots that glow very brightly, and the light contains rays that can harm the eyes of a person who does much welding. Over the years a variety of glass types have been used in aluminum welding goggles.
None had a really good combination of resistance to heat and breakage combined with ray control capability and a clear view of the work being done. In 1989 Kent's firm developed and patented a new welding goggle glass that has superior eye protection qualities. We have already noted that some special aluminum-working tools are expensive. Some idea of the truth of this is obtainable from noting that a piece of this glass measuring 2 inches by 4.25 inches sells for over $100.00. But as one's eyes are so important, the protection this glass affords is worth the price. See the TM 2000 glasses
White has learned many things in his years of aluminum work. For a long time he had problems teaching some students to weld. They just couldn't seem to pick up the knack of heating the metal just right. He finally realized that the usual method of testing eyes for depth perception did not work well for the short distances between eyes and work typical of aluminum welding. By fitting inexpensive reading glasses of suitable diopter inside welding goggles, the poor close-range depth perception of these problem students was overcome, and they then learned to weld effectively.
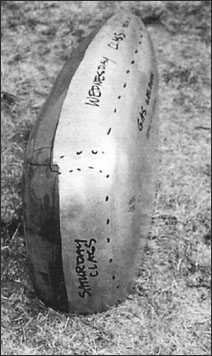
Most sheet aluminum airplane components having compound curves must be made up from two or more pieces of metal. After each has been formed into the required shape, they are welded together to form the unit as a whole. The pieces are all blocked into proper relative position and welded into a single unit. To start the welding, white tack welds them together. Me does this by using the sensitive little Meco torch to get very small molten spots every inch or two.
In effect, the pieces are stitched lightly together. This holds them in proper position relative to one another and also does much to keep the assembly as a whole from warping as the final seam welding progresses.
Another obscure but useful thing he has learned is that it's very important to remove aluminum welding flux residue promptly, using a stainless steel brash and hot water. Bits of flux residue remaining on the work can "erupt" some weeks later and mar a beautiful paint job
The word "planishing" is much used in aluminum forming work. It means to smooth up a metal surface by gentle hammering. This is where the "slapper" tool is much superior to hammers. Where the nose of a hammer will cause dents, the polished surface of a slapper works so as to push down high spots and therefore, at the same time, to bring up low spots, while at the same time not denting the metal. One of White's publications, the 16-page book-let Repairing Aluminum contains a useful coverage of the shrinking technique. The six-page pamphlet Using the Slapper gives a good sense of how this tool works and is to be used.
The photos that follow convey a general idea of how three different airplane components were shaped from sheet aluminum. As far as we are aware, this is the first time any aviation magazine has brought its readers how-it's-done information of this kind. Enjoy!


