Forming Wing Ribs
Templates and form blocks speed the process
from Sport Aviation, February 2002by Kent White
Wings are what hold an airplane up while in flight, and they must be constructed to be both light and strong. The spars are the wing's main structural elements and are usually made of wood or aluminum. The wing ribs are joined to the spar to give the airfoil shape, making lift possible and distributing the load over a larger surface area.
Wing ribs may be constructed of wood or aluminum, and aluminum ribs may be either formed sheet or formed extrusion. Light planes such as the Piper or Interstate have the skeletal aluminum ribs while heavier aircraft like the Bearhawk have ribs of formed sheet. Eet's look at the process of forming ribs of aluminum sheet.
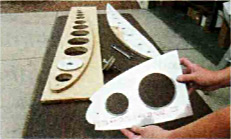
 The little cutting templates (with fingers) are made of MDF and apple plywood. On the templates' faces are the paper patterns from Bearhawk plans, which are well detailed with locations and sizes for all critical items such as locating-pin holes, rivets, miscellaneous holes, etc. These blocks sandwich the rough-sized aluminum sheet between them, and a router follows around the hard outline to accurately cut out the blank.
Because we expect an airplane to have nice smooth wings and fly straight and level, we must make our parts accurately. This accuracy begins with cutting out all the blanks and follows with forming them into ribs. We could cut all the blanks by hand, but this is tedious and requires a certain skill. The same goes for the forming method.
To avoid this tedium we can make cutting templates so we can mass produce cut blanks. And we can develop a set of dies, called "forming blocks," for each rib that produces formed ribs that are nearly identical to each other.
Whether we're going to craft a few replacement pieces or an entire set of ribs, we must begin by working from a set of plans, drawings, or the remnants of original parts. From a usable drawing we will make some cutting templates, which are hard patterns that a router follows to cut blanks accurately.
Both the templates and the forming blocks can be made of wood. But which wood, you might ask? Soft woods like pine, common CDX plywood, and fir are not acceptable because they break down, either under the forming pressure or from the repeated pressure of the router bearing. Oak, maple, hickory, MDF, or apple plywood are suitable materials for these two applications.
Both the templates and the forming blocks
can be made of wood. Oak,
maple, hickory, MDF, or apple plywood are suitable materials for these two applications.
Cutting the wood blocks to their specific shapes requires a stable and reasonably powerful tool, preferably a band saw. Not a lightweight table mounted band saw, but one of the nice horizontal units that will stand vertically, and it will cost about $200. Besides wood, this saw will enable you to cut tubing, aluminum bar, and what have you for your project.
You can even cut bundles of hose-clamped material accurately, and it shuts off automatically to save you precious time. You can set up the saw between two worktables, allowing for long pieces to slide easily down the length of the long working surface. While on this topic, another indispensable tool is the drill press, which we'll need to cut large holes using either a hole saw or a fly cutter. It will also allow you to drill nice, true locating-pin or dowel holes in the stacked blocks.
If you have full-size paper patterns, it's a good idea to adhere them to the surface of the wood with a light spray adhesive, then cut outside the pattern line to part off the blocks, and lastly, belt sand the edges right to the line.
A portable belt sander may be lashed up with brackets and clamps for stationary use and still be available for portable work later on, saving time and shop space. The edges of the blocks may be sanded to a 90degree angle if the blocks either make both left and right parts or will be used with TO aluminum material. Or you can sand the edges to a 100-degree angle if you're using T3 aluminum, to account for the metal's spring back. Make sure all edges are sanded free of bumpy saw marks or the router will translate those into irregularities on the edges of your parts.
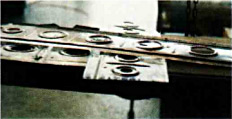
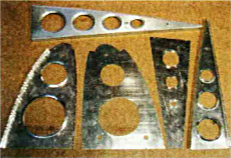 These blanks (center pair, made of 0.025-inch 2024 T3 aluminum) were part of a stack that was cut with the router. They have been deburred and are ready for forming.
Now that the cutting templates are ready, you should next rough cut the aluminum blanks, and I mean rough! Because you will have plenty of time in later operations to bless each part individually, I suggest making rapid and efficient progress at this phase. With any old shear cut the aluminum sheet to within 3/8 inch of the template line, stack the blanks no thicker than the depth of the cutting edge of the router bit, clamp the stack, and mow off the edges with a whisk of the router.
The bit should be the same diameter as the bearing; a laminate bit will do nicely for the T3, and a touch of wax on the edges of the stack will help free the chips. If you're going to work with "O" condition material, then slow down the router speed or get a bit that has only one cutting edge, because the softer aluminums "mush" into the cutter and load it excessively.
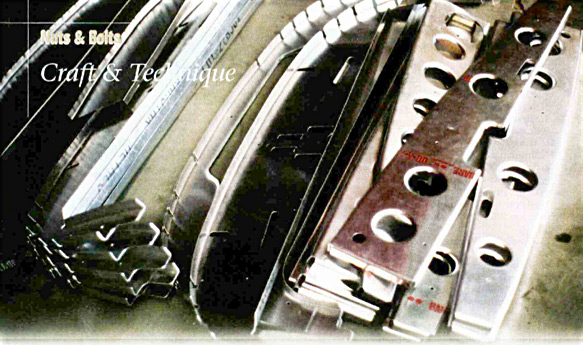
 Form blocks can provide many functions, even as lightening hole dies. This form is about 5 feet long.
This process is a howling abrasive storm that leaves silvery snow all over the place, so wear good eye and ear protection. I duct tape the snorkel of the Shop-Vac in place to inhale most of the snow, hut it loves to rapidly disperse around the shop anyway.
You cut out the form blocks much the same way as the templates, but take care with the radius of the forming edges so the aluminum does not shear or crack during the bending. For 0.025- and 0.032-inch aluminum, the 1/16-inch radius is a minimum. Remember that the radius is half the diameter, so a 1/16inch radius looks like a 1/8-inch rod. ] do not like either minimums or overly delicate work, so \ use a 1/8-inch radius (looks like a 1/4inch rod), and the router is again brought into service for this. If the ribs have lightening holes, the forming blocks may include provisions for flanging them. Careful sawing, sanding, and routing can assure good dies, especially for irregular holes or openings.
Forming blocks are routinely used to flange the edges of the ribs, especially where curves require inside or outside flanging. Hardened aluminum has inherently high resistance for a new shape to be formed into it, especially a curved one.
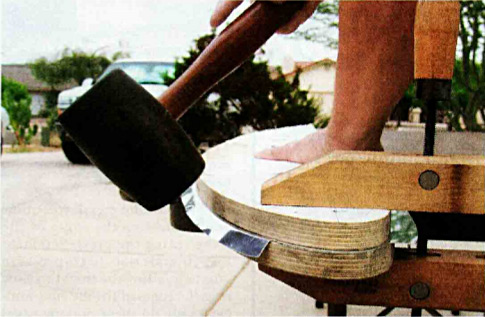 Using any of a variety of pounding tools you can bonk the flange over the form. Be sure to do the straightaways first. Try to bring the whole flange down gradually, as forcing one area completely may leave an unexpected lump somewhere else.
In trapping the aluminum sheet between two hard surfaces, we're giving it no other choice but to form into the curve. Using a "pry" stick to flange the edges of lightening holes is another method, using a 1-by-linch hardwood stick with a slot cut across the end.
This stick is a conventional tool for many metal-forming operations and has roots deep in metalworking history. By cutting the slot to a particular depth, the stick automatically sets the width of the flange, and you lift and slide it along the metal, gradually cocking up the edge over a number of passes (paraffin on the metal surface helps). To make the 30degree bend around the holes, three passes usually does it, with a routine amount of predictable distortion.
Which comes first, the flanges on the rib's edges or the edges of the holes? It depends on the distortion, which operation generates it, and which helps remove it. Practice actually helps alleviate much of it during the hand-working segments, though flanging the holes may add or subtract , sometimes rather capriciously.
If you use the all-in-one form block, you can correct the curvature that results by fluting. The fluting needs to miss the rivet locations, but otherwise it acts as a shrinking operation to take up the slack along the edges. If you're using blocks that must reverse to make the mirror image, then you must hand work the edge up to a true 90 degrees. With T3, hand working the angle to a true 90 is not difficult if you back up the part with a sandbag and tap the edge of the flange with a plastic-faced hammer.
Pressing shapes with an H-frame shop press isn't that difficult, in certain instances. Dies for the rib's lightening holes may be machined of steel, and once the hole is cut, you can press in the flange with little or no distortion. The drawback is that those dies take time to make, when you could be making parts instead.
If you have access to an aluminum heat-treater, you might think about routing out beads and such in some MDF and using rubber pads to push in the relief. Otherwise, making a picture-frame die of MDF, and then a center plug with just enough edge clearance for the thickness of the metal, will allow you to draw up the edges of the flange using the press. You must use TO material, high-pressure grease to allow the metal to flow over the edges of the die, and sufficient radii on these working edges so that the metal does not shear as it tries to move.
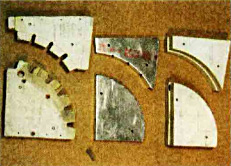
 These (0.050-inch 2024 TO) ribs for a P-40 Warhawk were pressed in a simple shop press using rubber pads and routed MDF.
Remember to practice on a few trial parts to smooth out your technique. Organize your tools and work space, plan ahead, and keep an eye out for that eighth dwarf, "Lumpy." The parts do get better with time and practice, so don't sweat too much about little irregularities.
I'd like to thank Benton Holzwarth, Kevin Deutscher, and Russ Erb, all Bearhawk builders, who so kindly donated photos, parts, and tooling for this article. If you wish to see and learn more of this process in a clear step-by-step method, you should consider getting the Bearhawk reference CD (cheap). Contact Russ at erhman@pobox.com and tell him you saw this stuff in EAA Sport Aviation.
EAA Technical Counselor Kent White achieved master technician's status in 1976 at Hawaii's Auto Collection, where he restored metal components for aircraft and autos. He started his own metal restoration company in 1977 and now teaches, writes, and develops tools for metalworking while he still pounds out parts. He encourages any welder or metalworker, man or woman, to contact him in regard to preserving the traditions of aircraft metalworking.
Contact him.


