Aluminum Alloys - Annealing
The Family of Aircraft Aluminums â continued
See TM Technologies Aluminum Gas Welding System
By Kent White
This article appeared in Sport Aviation magazine, November 1999, and is a continuation of the article
The Family of Aircraft Aluminum Alloys
Note: This version from the November issue of Sport Aviation is the original UNEDITED version. Due to
major changes in staff at Sport Aviation, the published version had severe accuracy edits.
-Kent White
Annealing
From the previous article we learned that working metals into new shapes increases their strength and hardness, resulting in a work-strengthened material with new shape. While simple parts, like low-crowned skins, instrument panels, tanks, and some side cowlings can be formed easily in the required temper, the complex and deeply formed may not. These complex beauties need sustained heavy working. To remove this work hardness from the non-heat treatable aluminum alloys is as
|
Key WordsMetal - An opaque crystalline solid, having high thermal and electrical conductivity, and the ability to flow before fracture.Recrystallization âAfter all metal crystals have been dissolved by heating enough to lose its structural strength, the metal temperature then falls, allowing the crystals to re-form. Quenching â Cooling metal at a specific rate, with a given medium. Precipitation hardening â As the quenched alloy ages, a new material precipitates out of the metallic crystal lattice, filling in abutting spaces, and increasing hardness. |
simple as elevating the metal to the proper temperature, holding for the appropriate length of time, quenching, and voila! Soft metal (with a distinct absence of cracks or melted holes) is now ready to do your bidding. What? You get melty spots, cracks, and unhappy parts with your present method? Read on, dear craftsmen, as we introduce you to a highly reliable method designed to give you successful results.
The non-heat treatable aluminum alloys may be torch-annealed many times to achieve the necessary shape. Fairings and fillets in particular require such heavy working and such great changes in shape that frequent annealings are quite necessary. Both proper heat application and temperature measurement are important. For 1100 the proper annealing temperature is 650F, for 3003, 775F, and for 5052 it is 650F.
|
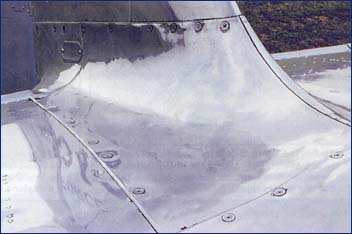
Complex shapes like this tail fillet need considerable working and annealing cycles to achieve consistent
shape, strength, and fit. |
The amount of time at temperature for these particular alloys must only be enough to thoroughly heat either the entire work-hardened area or the complete part. If 3003 alloy is held too long at temperature its grain-growth becomes excessive. Our goal is only to soften the metal enough to work it, while not heating it so much that the grain structure increases excessively, causing the panel surface to become roughened when it is bent or folded over. This surface roughness can be a source of stress-corrosion cracking later on, so this grain-growth is to be avoided. The rate of cooling (quench) is unimportant, although it is safer to cool quickly as aluminum does not show its heat by changing color.
Many years ago I would heat a large panel in a busy open shop setting and leave it to cool slowly in the ambient air whilst away at lunch. Once upon my return, I was dismayed to see a hand print burned onto the surface from an unsuspecting ``looker". Since then I have always quenched my work, whether with a dripping rag, a convenient snow bank, or perhaps even a CO2 fire extinguisher. A cold blast of air from the blowgun works well too, and like the CO2, it requires no extra time spent drying off the work.
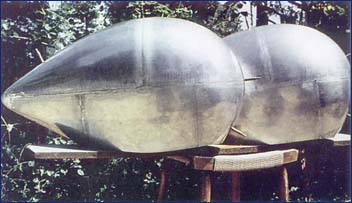 These gently dished wheelpants were made from 3003, H14, .050" aluminum with only minor spot-annealing.
 |
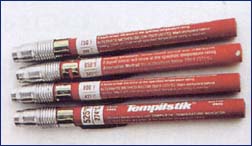
When it comes to marking or measuring the right temperature for annealing, I can imagine a good winter's night roundtable topic tossed about in front of the cheery woodstove. Some prefer to heat with the neutral torch flame, and rub the panel with either a bar of soap or a stick of soft pine, waiting for the material to char. At that point the temperature is somewhere around 650F. Some like to mark the aluminum with black felt tip pens before heating, but some pens are heavier in carbon content than others, so watch out for the more interesting results!
The techno-reader might now be thinking of the digital infrared thermocouple devices now sold for analysis work, but they do not work well at all on these reflective surfaces. Aside from the traditional and very convenient torch-soot method, I personally tend toward using the temperature indicating crayons sold in many welding stores. These crayons are remarkably accurate, easy to use and usually cost less than replacing most ruined new panels.
|
The torch-soot method of annealing aluminum sheet needs to be specifically addressed here, partly due to certain well-meaning automotive influences, and partly because of the temporary wane of the aircraft metalworking tradition.
The torch-soot process is the method whereby the workman sets the torch to either pure acetylene or an acetylene-rich condition and coats the panel with the appropriate amount of soot. After resetting the torch either to a neutral flame (hot) or to an oxidizing flame (really hot), he then burns off the soot, achieving the proper heat necessary for recrystallization of the aluminum alloy, and its attendant annealing.
 The neutral torch flame is burning pure acetylene soot off of a 5052, .040" P51 stab tip. The flame causes
the soot to glow in this case, because the coating is very thick.
The neutral torch flame is burning pure acetylene soot off of a 5052, .040" P51 stab tip. The flame causes
the soot to glow in this case, because the coating is very thick. |
Now we come to those well-meaning automotive influences.
First of all, in automotive coachwork the alloys may be the same (1100, 3003, and 5052) and the forming tools (hammers, mallets, shotbags, spoons, files, etc.) similar, but the sheet tends to be much heavier. Production and custom aluminum cars all tended to have panel work in the .050" to .090" thickness range, with the bulk being .063" (hotrods included).
Autobody people can use the pure acetylene flame for annealing, since the heavy aluminum thickness will withstand the heat necessary to burn off that nice velvet coating. However aircraft thicknesses range from .025" to .050" with the bulk around .032". For these thinner sheets, the acetylene-rich flame is far more successful for the craftsman and much less threatening to the work.
 ``Oops! Is it soft yet?" This illustrates how interestingly pure acetylene can indicate temperature on .025".
Nah, I've never had that problem, either.
``Oops! Is it soft yet?" This illustrates how interestingly pure acetylene can indicate temperature on .025".
Nah, I've never had that problem, either. |
(NOTE: The old aluminum racing cars from Ferrari, Porsche, Aston, etc. were largely .040", with the very unusual exception -in my experience- being the 250GTB Ferrari built in secret to beat the Cobras. For this quite successful effort the rockers, door skins, and many of the interior panels were .032"!)
For aircraft aluminum panel working then, the method is as follows: Choose a torch tip anywhere from equal to half again the metal thickness, and set the flame with a squeak of oxygen to 1/8 turn of acetylene, (or a ratio of about half oxy to acet.)
|
|
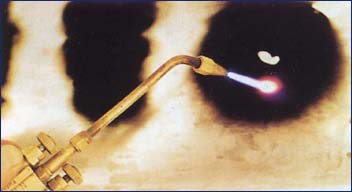
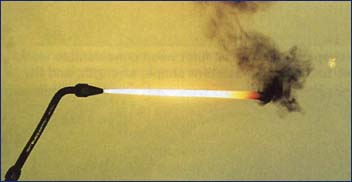 The
pure acetylene
flame. Note the lurid yellow flame, and that the ``paratroopers" or ``blackbirds" are abundantly lifting off
the flame tip. (Hats definitely recommended.)
The
pure acetylene
flame. Note the lurid yellow flame, and that the ``paratroopers" or ``blackbirds" are abundantly lifting off
the flame tip. (Hats definitely recommended.)Use the torch like a paint spraycan, giving the panel only a very light coat to begin with, using only the very end of the flame and moving it rather quickly. You will notice that the tip of the long feathery flame leaves only a trace of soot, ideal for thin (.025") sheet.
Next, make a pass going more slowly and ``mushing" more of the flame against the sheet. Going slower and pushing more of the flame against the panel leaves a darker streak, better for .032" and .040". Making more passes with the ``painter's torch" makes the coating thicker with each pass, thus requiring more heat to burn off, and allowing for more metal thickness to be uniformly heated at the same temperature. Soot thickness is directly related to metal thickness for this process.
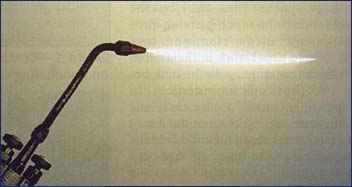 The
acetylene-rich
flame. Note the bulk of the flame is bright and not pure yellow, while the complete combustion at the very
tip of the flame eliminates the sooty ``fliers".
The
acetylene-rich
flame. Note the bulk of the flame is bright and not pure yellow, while the complete combustion at the very
tip of the flame eliminates the sooty ``fliers". |
Now reduce the amount of acetylene, increase the oxygen to get a neutral flame, and heat the panel at the edge of the soot. As the temperature climbs, the soot will burn off the panel very evenly, with heavier spots maybe needing more heat (careful!). Letting the heavy soot spots go unburned might be a good safe idea, so just focus on burning off the coating in an even wave, and then just wipe off the remaining spots after quenching.
Once heated, then it's time to quench. Splash with cold water, slosh with a drippy rag, blow with air nozzle, or blast away with a CO2 fire extinguisher.
|
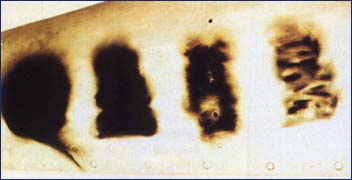
This P51 stabilizer tip has, from left to right, four soot marks going from pure acetylene to lightly coated. If applied to their appropriate sheet thicknesses, they would correspond to .063" and greater, .050 - .040", .032", and .025". |
5052 can be a bit fussy about being torch annealed because this alloy oxidizes easily at elevated temperatures, leaving dark splotches of oxidized metal on the surface.
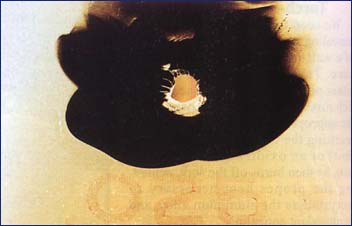
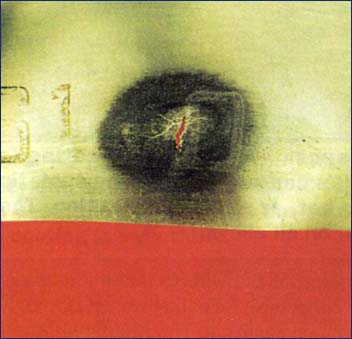
 Melty spot caused by overheating, and it is rough to the touch. Causes: nitpicking soot, tip too large, flame
too hot or simple inattention. Appearance is similar on all alloys.
Melty spot caused by overheating, and it is rough to the touch. Causes: nitpicking soot, tip too large, flame
too hot or simple inattention. Appearance is similar on all alloys. |
Now, about those heat-treatable materials
There are certain shop-worn traditions, found mostly in commercial aviation facilities, which allow for certain ``bending of the rules" in regard to the torch annealing of T-3, T-4, T-6 etc. tempered aluminum alloys. Please note here that the criteria for annealing heat-treatable metals of all kinds are fairly exact, and quite scientific.
6061 is perhaps the best place to start because it is the most forgiving of transgressions. 6061 can be partially annealed with the torch, but to do so means that the resultant temper, when it naturally age hardens back again, will only be very roughly approximate. Soot the area to be annealed as we have discussed, or use a crayon to bring it up to 650F and quench with cold
 Ignoring the melty spot, and then working it with mallet and shotbag only stresses the area, and soooâ¦crack!
If the alloy is weldable then it is only a quick fix, and you are off and running again. If it's
not weldable, thenâ¦scrap!
Ignoring the melty spot, and then working it with mallet and shotbag only stresses the area, and soooâ¦crack!
If the alloy is weldable then it is only a quick fix, and you are off and running again. If it's
not weldable, thenâ¦scrap! |
water. Give it a bend test with your fingers in both places, the hard and the annealed. See? Now you have a few hours to work it before it age hardens again. 2024? Don't do it! I know some old-timers do it, and maybe you do too, but have you ever gotten one to admit that this method is absolutely foolproof? Never a tiny crack? Neither have I, and for that reason I strongly caution against it. The Aluminum Association is against it, and so are Reynolds and Alcoa. ``Sometimes" shouldn't indicate a sound method for anyone. If annealing 7075, 2024, 2014, 2017 etc. is required, then do it in an oven where the temperature is accurate, the soaking time is sufficient, and the quench is performed with the specified rapidity.
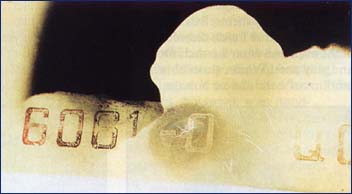
 This Pilatus stabilizer tip was heavily crunched and then replaced, leaving it to be used as a demonstrator
for workshop annealing instruction. The torch tip indicates one of the slightly overheated
spots. These are not detrimental to integrity in this case, as they are only slightly
discolored, not melted, but smooth to the touch. Such is the nature of 5052 that while these
marks are fine if left alone, they might not stand up too well to really heavy hammering. (end
caption)
This Pilatus stabilizer tip was heavily crunched and then replaced, leaving it to be used as a demonstrator
for workshop annealing instruction. The torch tip indicates one of the slightly overheated
spots. These are not detrimental to integrity in this case, as they are only slightly
discolored, not melted, but smooth to the touch. Such is the nature of 5052 that while these
marks are fine if left alone, they might not stand up too well to really heavy hammering. (end
caption) |
Both students and craftsmen alike puzzle over how some of these danged aluminums can get softened in the oven and then harden all by themselves by natural aging one time, and yet at other times they can come out of the oven and sit on the shelf for years and still be soft! Boy, could I have fun with that one: It's the amount of calcium carbonate in the quenching water, you see. Softer water makes for softer aluminum. I know, straight answers only, please!
Without delving deeply into the fascinating field of metallurgy theory and practice, let's just clear up the basics:
Heat treatable aluminums are hardened to a specified strength simply by heating to the proper temperature, (820-1010F, depending on alloy), holding for a complete thermal soaking, (minutes to hours, depending on mass and size of
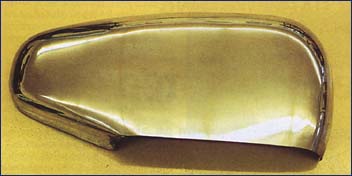 Originally this blank Cessna 195 pant would have been clad 2024, T6, .032". Its method of manufacture would
have been pressing immediately after quenching, then aging to full hardness. This replica,
however, was hand-formed of 5 separate pieces, butt-welded with the oxy-acetylene torch and then
finished to a high polish â all with no annealing! (More about this stuff later)
Originally this blank Cessna 195 pant would have been clad 2024, T6, .032". Its method of manufacture would
have been pressing immediately after quenching, then aging to full hardness. This replica,
however, was hand-formed of 5 separate pieces, butt-welded with the oxy-acetylene torch and then
finished to a high polish â all with no annealing! (More about this stuff later) |
load), and then immediately quenching in different solutions of varying temperatures (100F max.). After quenching, the precipitation hardening process starts, whereby the metal ages naturally to achieve its designed strength.
When the alloys are ``as quenched" they are nearly as soft as fully annealed and may be pressed or drawn into shape in that condition right after quenching. If time or design criteria dictate though, artificial aging is engaged by oven heating the parts (240-380F) for from 5 to 37 hrs, which is much faster and more specific than the days or weeks required for natural age hardening. Sub-freezing temperatures will suspend this aging however, hence the name ``icebox" rivets.
Annealing heat-treatable aluminum alloys is accomplished again by heating and cooling but in a different procedure. The metal is heated (650-825F), held for a good soak, and then cooled very accurately at the rate of 50F per hour until the temperature is 400-500F, depending on the alloy, and then the rate of cooling is unimportant. Different methods of annealing are required for different aspects of fabrication, such as warpage and distortion control, secondary pressforming operations, deep drawing, etc.
Stress-relief annealing, partial annealing, and full annealing employ the different temperatures and cooling rates specific to each heat treatable alloy. Unlike the non-heat treatable aluminum alloys, these heat treatable ones do not anneal as fully the second or third time through and so some loss of workability must be expected.
(Note: For learning more about the aircraft family of aluminums, their applications, annealing, and the basic forming methods of stretching, shrinking and planishing, EAA offers a 130-minute instructional video from TM Technologies entitled, ``Shaping Aluminum Wheelpants".)
References:
Metals Handbook, 8 th Ed., American Society for Metals
Aluminum, Fabrication and Finishing, American Society for Metals
Metallurgy, American Technical Society
Standard Handbook for Mechanical Engineers, 8 th Ed.
Thanks to: Alcoa, Reynolds, and The Aluminum Association
Back to Articles by the Tinman


