3-Piece Shrinking Set - Hard Metals
3-Piece Shrinking Set - Hard Metals
Made in USA - Exclusively by TM Technologies
3-Piece Shrinking Set - Hard Metals |
 |
||
| SMS-0140 | $317.00 | ||
| |
|||
|
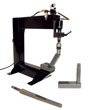
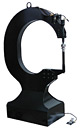
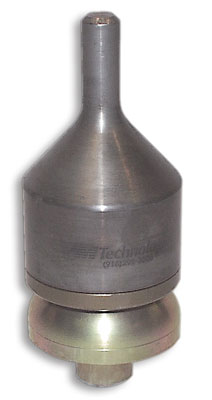
Our Shrinking Die Sets are our most popular dies, and for good reason. You really can shrink with these dies, even in the middle of a panel. I have spent hundreds of hours, using and refining these (and other) die sets. Please understand that I will only sell something that works well. Not only well for me, but for my students. If they can do it without my help, then I know it will work for you.
You do need to spend a bit of time mastering the technique for shrinking with these dies (which you can learn on our Air Hammer Operations DVD). It takes some practice and skill, but once it clicks, you will find yourself able to shrink considerably faster than you ever could by hand, and with much better looking results. Use these dies for shrinking the harder metals, such as cold-rolled steel, 5052 1/2 hard, 6061 T3, and soft stainless. You can shrink up to .040" with the #2 medium air motor, .050 with the #3 heavy motor, and .063 with the #4 very heavy motor. Note: These ratings are not absolute, but are based on true results with the benchtop model, and using Kent's skill. Your results may vary, depending on air pressure, type of metal you are working with, and your skill level. Max Capacities - 12 gauge mild steel About our Dies We designed these dies based on 20 years of experience with our TM Air Power Hammer. We make these dies ourselves from high quality steel which is precision machined, hardened properly, tempered, and in some cases precision ground, for a perfect face or contact area. These are not cheap “make-do” tools. The engineers and metallurgists we work with have many years of experience in industrial design and manufacturing. When you buy our parts you are getting U.S. industry-standard quality. Every item we sell is tested in our shop, not on the customer. What you receive from us is tried-and-true. Guaranteed! You are looking at a piece of flat copper that is approx. 18 inches in diameter being shrunk into a bowl or domed shape. To do this, you will need to hold the metal at a 45-degree angle upwards into the dies, allowing a hump to form over the lower die. Hit the foot pedal so the hammer hits regularly, but not rapidly. This will shrink the metal into itself in a few hits. Allow the metal to shrink left and right or right and left. You may shrink in or back out towards the edge of the panel. Work the shrink back into the panel, if this helps make the radius of the shape larger. Start over at the edge of the panel and shrink more if you need more curvature. The higher the crown offered into the dies means the more they will shrink. Now, as for the number of pieces: The upper die is two pieces, one inserted into a cup. The lower die is another piece. This makes the count of three pieces. – Kent These customers describe in their own words how the shrinking dies work: "I'm no expert but here is how I think about it. The idea with many shrinking techniques is to somehow trap the excess metal in some form of ruffle, tuck or bubble and then drive it back into itself making the metal thicker. With the air hammer you shrink the edge, which gathers the metal along the edge and this imparts a curve to the panel. Any edge shrinker does this. Anyway, if you were to now lay that panel on the floor and push the edges to the floor you would see a bulge just inboard of the edge you have just finished shrinking. This is in effect what you're doing on the air hammer when you start to drive the shrink inward ... you're flattening the edge of the panel on the lower die with gentle taps (so you don't stretch it back out) and this creates a the bubble of extra metal just ahead of the upper die which you then chase into the panel. It's a bit like taking a rolling pin and rolling from the edge to the interior of the panel. If you're careful you catch up with the bubble and drive it down without expanding the surrounding material. On one of Kent's videos, he shows how to shrink with an English Wheel using this general idea. I have found the system to be incredibly flexible... and portable. Moreover since I have tendonitis in both arms (from playing the fiddle!!! ) and I have to keep the hand pounding work to a minimum. Being able to stretch, shrink and planish all with the same power tool has been a real life saver. In some situations you can actually do all three operations with a single pair of dies just by varying the air pressure with the foot pedal. The technique is not difficult, it's just hard to explain. The first time you see someone who's good at it work a piece at a quick pace, it really is almost like magic because the metal seems to flow like plastic as the ruffles appear and then are worked back in." – Howard "It is difficult to describe "HOW" to shrink on the Kent White style dies. I'll try by describing what one does. It would be a hell of a lot easier to just see one in action. The reaction is UH-OK. You first use the power-hammer to bend a flange where you need a 'shrink.' Then, using the post, the hammering action, and some "body-English," you bend the panel around the post of the tool, pull it out, rotate the panel and bend it again. If properly done, a 'tuck' results. The tucks are flattened just as one would do with hand tools. These shrinks can be ‘worked-in’ or ‘chased inside’ — and as one becomes more proficient, the panel takes shape and gets partially planished at the same time. A medium air motor seems about right for 20-gauge steel and 1.5 mm Aluminum. The pressure can be turned down and 1 mm Aluminum can be shaped/shrunk with the same motor — and same diameter tool shank (.498). Smaller motors can then be used for planishing." – Ron A set of shrinking dies on the job! These dies shrunk the edge of this .125″ 3003 using the very heavy Aluminum. Minor marks, if any. 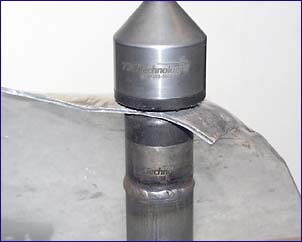 This video shows how our Shrinking Dies work. Hi â Res Low â Res The following two videos demonstrate how quickly you can remove a flared and/or flanged edge. The panels shown have a reverse curve that was created with the Large Reverse Die Set, that then had a flange created on its edge of the flare with the Flanger Die. Both demonstrations below use the #2 Medium Air Motor. 20 Gauge Steel using the Shrinking Set for Hard Metals: Hi â Res Low â Res 1100, .050, Aluminum using the Shrinking Set for Soft Metals: Hi â Res Low â Res Here is a high crown in the center of a panel being shrunk down flat using a #2 Medium Air Motor on 20-gauge steel.. Hi â Res Low â Res Shrinking back into the panel. Here 1/8-inch, 3003, aluminum is worked using the Shrinking Die Set for Soft Metals and the #5 Extra Very Heavy Air Motor. Notice how smoothly the metal moves as it is worked and how the shrink that is made is worked back into the panel. This gives you full control to work anywhere on the panel which is just not possible when you are using “Thumbnail” style dies Hi â Res Low â Res Shrinking various gauges of mild steel. The videos below show 18, 16, and then 14-gauge steel all of which are worked with the Shrinking Die Sets for Hard Metals. The 18-gauge steel is shrunk using the #3 Heavy Air Motor while the 16- and 14-gauge are shrunk using the #4 Very Heavy Air Motor. Please note that the air motors chosen for each operation work can be varied depending on your need. If faster results are desired then upgrading to the next heavier air motor to perform the same shrinking operation is an option. So for example, on the 14-gauge steel, the user could use the #5 Extra Very Heavy Air Unit in place of the #4 Very Heavy Air Unit that is shown here. 18 Gauge Steel: Hi â Res Low â Res 16 Gauge Steel: Hi â Res Low â Res 14 Gauge Steel: Hi â Res Low â Res |